Love browsing our brocades? Looking for an excuse to take some home? Brocade is not just for bow ties and bustiers anymore. Make this gorgeous bomber jacket – a practical, elegant statement piece you can take out in the spring and wear until fall. This sewing tutorial shows you how we did it, and delivers some great tricks for working with brocade too.
The bomber jacket entered the sartorial pantheon via the air force of course, though it's kissing cousins to the varsity jacket, baseball jacket, and letter jacket. Standard issue for soldiers, police officers, and ballplayers, it's a universal, unisex garment that always looks great.
You can make this jacket with pretty much any sturdy material, and wool, waterproof nylon, and cotton gaberdine are all fairly common.
But brocade? You can’t get much fancier, but the bomber’s sporty cut acts as a perfect foil. A brocade bomber is just the sort of chameleon piece you can pair with anything from jeans and a t-shirt to a dress and flats and even dressier outfits too. Wear it to work, on a date, out shopping... take it to a party.
Your bomber will be the MVP of your wardrobe (and you'll have the only one on the block).
Brocade combines well with ribbing in contrasting or neutral colors and the finished jacket will go with jeans or a skirt.
Who this sewing tutorial is for
This sewing tutorial is meant for intermediate sewers. We won’t explain the basics of cutting a pattern and sewing a straight line, but we will look at how to tackle welt pockets, zippers, and linings.
A bomber jacket is a biggish project. You can break it up into manageable chunks to do over time.
Raglan or set-in sleeves?
Bomber jackets can come with two sleeve types:
Set-in sleeves
Raglan sleeves
A set-in sleeve is your common, garden-variety sleeve, like the ones on a button-down dress shirt.
A raglan sleeve is a little sportier and works great in two-tone combinations (think letter jackets and baseball jerseys). For brocade, however, a raglan sleeve might not work as well because the seams can cut through the motif. Also, sometimes raglan sleeves are made of two pieces, adding another distracting seam down the the arm.
Bomber with set-in sleeves
Bomber with raglan sleeves
If you decide for raglan sleeves, you might embrace this element by highlighting the seam detail (with piping for example).
I opted for a set-in sleeve this time; that’s what you’ll see in the photos.
What you'll need for your bomber jacket
Materials for this project include brocade, lining fabric, thread, a zipper, and ribbing
Anti-fraying spray will save you time and headaches, for example Fray Check from Prym.
Make sure your pins are nice and sharp.
Use all-purpose thread and a matching needle (like my No. 80).
Bomber jacket pattern
First, find a sewing pattern. I used the Burda pattern from September 2014. It's presented as a men's jacket, but since bombers are unisex, it doesn't make any difference – just check the measurements (especially shoulder width and arm length).
Other good candidates for this project are Burda May 2021 and McCall's M7636 and M7637. Of course, your favorite online source for patterns is likely to have one too.
The basic bomber comes in a number of variations. You can have ribbed cuffs or sleeves gathered with elastic; ribbed collars, classic collars, no collar at all; a zipper or snaps.
For this tutorial we're sewing a zip-up bomber with set-in sleeves and ribbing.
Choosing brocade for your jacket
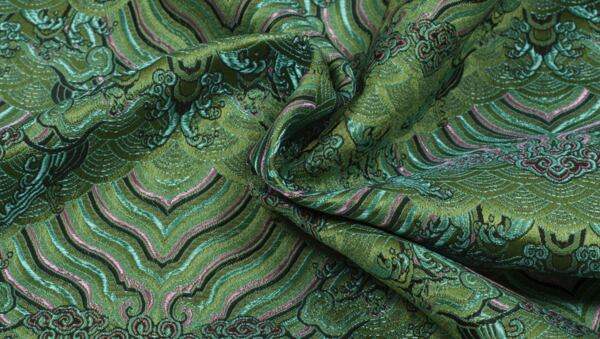
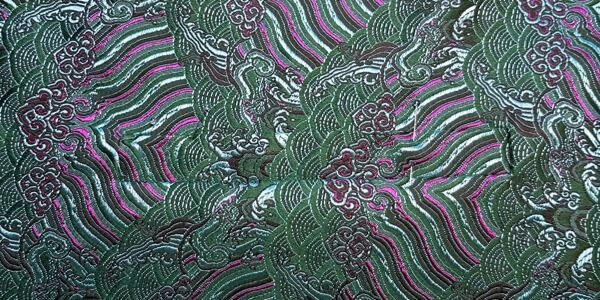
First take a moment to choose your fabric. I used our Heaven brocade. There are plenty of other gorgeous options. Take your time.
Once you've zeroed in on your brocade, you'll want to know how much you need.
Look at the bolt width. Our classic brocades are usually 73 cm wide (29 inches). So you'll need a longer piece than for a standard-width fabric.
Note: Measurements are given in this tutorial in inches, followed by rough equivalents in centimeters. You can use whichever you're more comfortable with.
Pattern pieces:
One rear panel
Two front panels
Two sleeve pieces
Three facing pieces
Four pocket pieces
Left to right: Front panel, back panel, sleeve, front facing, back facing, pocket. The numbers show how many you need to cut.
It all depends on what size you're making. First up, bombers are loose fitting, with an extra 4" to 8" (10–20 cm) around the chest. So if your chest measures 36" (90 cm), the jacket will be 40" to 44" (100–110 cm) in circumference.
Pattern layout for 29" fabric (73 cm)
Fabrics with a bolt width of 29" (73 cm) will accommodate a back panel up to 28" wide (70 cm) which corresponds to a 47" chest (120 cm). That's a US women's size 20 or men's 40 (EU size 50).
Together the two front panels are as wide as the back panel, but you also have to add seam allowances of 5/8" (1.5 cm) all around. So, if you lay the two front panels side by side for cutting, they can be no wider than 25 1/2" (65 cm). That gives you a chest circumference for the bomber of 51" (130 cm), the equivalent of a US women's size 18 or men's 38 (EU 48). For larger sizes, you'll have to stack the front panels vertically when tracing.
Pattern layout on fabric 29" wide (73 cm)
Sleeves are trickiest. You'd think that a couple of sleeves would easily fit side by side. But the sleeves on our jacket have a pretty broad shoulder, from 16" to 24" (40–60 cm), so they simply won't fit. Luckily, the facing pieces fill in that empty space nicely.
A bomber jacket is usually 24" long (60 cm), with sleeve pieces 22" to 24" long (55–60 cm) without the cuff. That adds up to 96" (240 cm). Now add seam allowance and a little more fabric for facing and pocket pieces.
Pattern layout on fabric 55" wide (140 cm)
With a wider bolt width, the main panels can go side by side. Here's one way to lay out your pattern on fabric with a width of 55" (140 cm).
Pattern layout on fabric 55" wide (140 cm)
Add extra for the brocade pattern
If your brocade has a large, repeating motif (as my Heaven brocade does) the finished jacket will look neater if you make the effort to line up and center the motif on some pieces. Give yourself a margin of 15% more fabric so you have the wiggle room to frame the pattern on each piece. For example, instead of 3 yds (2.8 m) you might need 3 1/2 yds (3.2 m).
fabric requirements
width 28" 70 cm
width 55" 140 cm
US women's 6–18 (chest 43") EU 36–48 (chest 110 cm)
3 yds 2.80 m
1 3/4 yds 1.60 m
US women's 18–20 (chest 47") EU 48–50 (chest 120 cm)
4 yds 3.50 m
2 1/2 yds 2.30 m
US women's 22 plus EU 52 plus
4 3/4 yds 4.20 m
3 1/4 yds 3 m
Good lining fabrics for bomber jackets
Twill (or serge) makes a good bomber jacket lining. Try a lyocell twill, tencel twill, cupro twill, or even silk serge (a little trickier to handle). Choose based on your experience level. We carry a nice voile made of a blend of cotton and silk, however, it is not as thick and, being a plain weave, not as sturdy as a twill weave, so it may not hold up to heavy use. Of course, you can use an acetate lining too. A little polyester won't ruin your beautiful work.
For lining fabric with a bolt width of 53" to 59" (135–150 cm), you'll need 1 1/2 yds (1.4 m)
Ribbing for collar, cuffs, and waist
Ribbing can come pre-cut, usually in pieces 32"x 6" (80 × 16 cm), or by the yard. You'll need two pre-cut pieces or 1/2 yd (30 cm).
Choose a color to match your brocade. Ribbing comes in cotton or polyester. I'd recommend going for cotton (polyester tends to pill up). Ribbing comes in smooth and ribbed varieties, with ribbed being stretchier and the better choice for a bomber jacket.
Jacket zipper
Your pattern will list a zipper length, probably 24" (60 cm). If you have a longer zipper, it's easy to shorten.
Obviously, you'll need a separating zipper (the kind that comes apart at the bottom). A wide nylon spiral zipper with teeth 1/4" wide (6 mm), a molded plastic zipper, or a metal zipper will work. If you go for a metal zipper, try matching the teeth to the brocade – pair a golden zipper with brocades in warm tones or with golden patterns, and a silver zipper with cool tones.
Ideally the zipper tape (the fabric part) should be the same color as the ribbing or should match to the dominant color of the brocade.
Time to sew your bomber jacket!
Got everything? It's time to start sewing. (Don't worry, we'll take it one step at a time.)
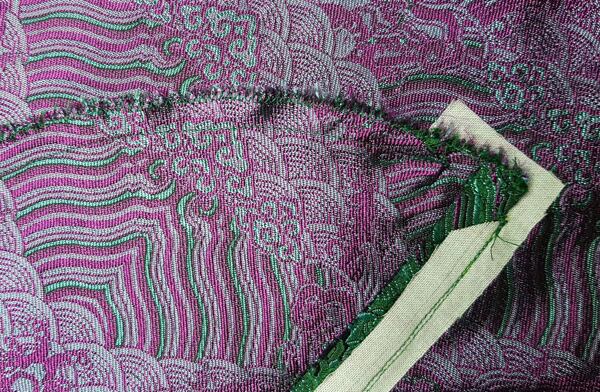
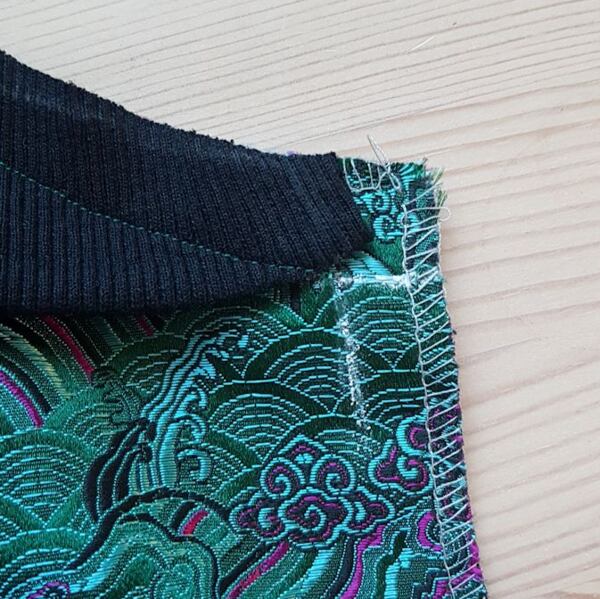
Cut out the pattern pieces for your jacket. Be careful, brocade frays easily. It has to do with the weave – the warp is made up of densely laid fine threads with thicker threads woven in between to form a pattern. All the threads are beautifully shiny and smooth, so of course they slip loose easily.
Brocade is notorious for fraying
The best thing to do is to finish the edges of each and every piece after cutting. Either use a spray like Fray Check (it hardens when it dries, so it won't work everywhere) or sew the edge with an overlock or zigzag stitch (this takes up some of your seam allowance).
For the purposes of this tutorial, please assume you should finish any rough edges, even if I don't say it outright. If you don't finish the edges at the cutting stage, then you should do it automatically after sewing a seam to keep it from fraying as you wrangle your work through the next steps.
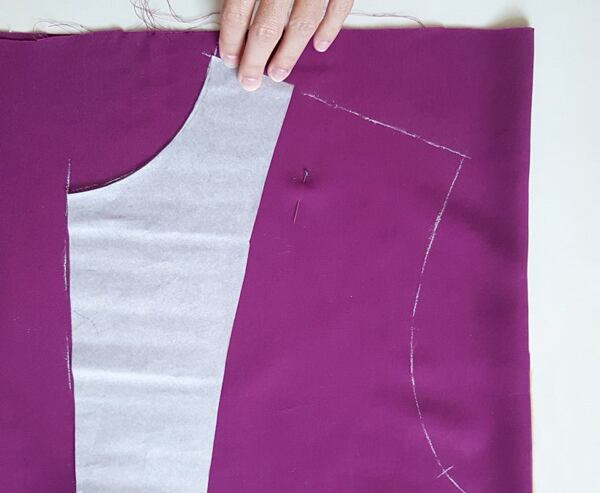
Frame the pattern of your brocade
When tracing, pay close attention to the brocade motif. For busy little designs this may not be a big deal, but for regular, symmetric designs (like the Heaven pattern shown here) you should frame the motif and keep it centered. Make sure the designs on each side of the zipper match up. The sleeves should be mirror images of each other too.
Note how I centered the motif at the top of each sleeve. The sleeves are mirror images of each other.
Pockets
If the prospect of sewing pockets makes you break out in a cold sweat, you really can leave them out entirely, or just add simple in-seam pockets.
I'll show you how to make elegant welt pockets. They're easier than you think. You just have to take your time.
Mark the pocket opening
On each of the front panel pieces, mark a rectangle for the pocket opening. This is where the welt will be. Rule of thumb is 6" (15 cm) by 3/4" (2 cm). Your pattern might already have pocket markings, if so, just trace them on. Don't do any cutting yet!
Reinforce the opening
Reinforce the pocket opening on the back side of the fabric with fusible interfacing – make a 3/4" (2 cm) overlap on all four sides.
Grab a pencil and sketch the rectangle for the pocket opening on the interfacing for reference.
Fusible interfacing ironed onto the back of the brocade.
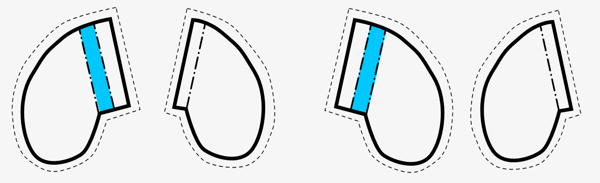
Cut pieces for the pockets
Each pocket hastwo pieces. One piece is a little longer because it includes the welt, in our case that's 3/4" (2 cm) more. Pocket pieces have a standard seam allowance of 3/8" (1.5 cm) all around.
Cut the pockets. The sketch below shows all four pocket pieces as they should be laid out on the face side of the fabric. On the left are the pieces for the right pocket and on the right are the pieces for the left pocket. The blue rectangle is the welt, which is the part that peeks out. The underside piece is smaller because it doesn't have that part. The dashed line around the edge shows the seam allowance.
Both welts should look the same – they should have the same motif, mirrored. This will make the final jacket look neater than if each welt were different.
How to sew welt pockets
First, grab some thread in a totally contrasting color and stitch to mark the rectangle.
You can see the stitching around the welt of the pocket on the face side of the fabric, above, and on the wrong side with the interfacing, below.
A welt pocket demands a little three-dimensional thinking. The sketch below should help.
Jacket panel (green) – The arrow shows the pocket opening. The seam allowance is shown folded in; we haven't done that yet because the opening is still not cut.
Welt pocket piece (red) – The longer pocket piece is sewn face to face to the seam allowance on the lower edge of the pocket slit and pressed so that the welt – our extra 3/4" strip (2 cm) – peeks out at the slit.
Back of pocket (blue), is sewn to the seam allowance along the upper edge of the pocket slit.
Both pocket pieces are then sewn all around the edges to complete the pocket, but this is not shown in the diagram.
F = face side
W = wrong side
Welt pocket diagram
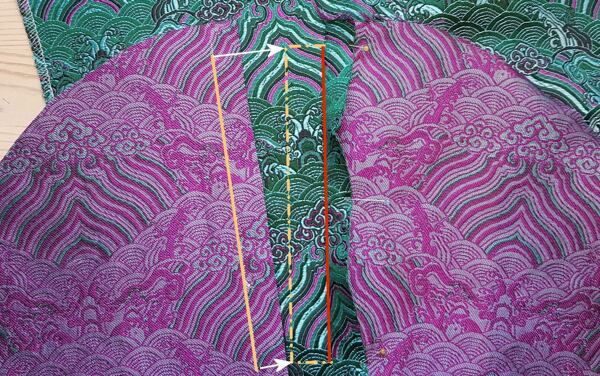
Pick up a front panel and its matching, longer pocket piece (double check to be sure!) and place the longer pocket piece on the face side of the jacket so that the seam line (the red line on the pocket shown below) is aligned exactly on top of the lower line of the welt (red line on the jacket).
The dotted yellow line in the picture below shows the pocket welt. Lay the pocket piece as shown (face to face with the pocket facing the jacket center) and move it over so that the red lines lie on each other.
Pocket piece laid out on the right front jacket panel. The side seam will be on the left and the zipper will be on the right.
Sew it on. It's easier from the back, where you have the line marked. Sew only along the line, not all the way to the edge of the pocket piece – leave the seam allowance loose.
Sew on the other (shorter) pocket piece pretty much the same way. Again, face to face, this time along the upper edge of the pocket opening.
See the next picture. On the right you can see the longer pocket piece sewn on, with the red line marking the seam. (I folded the seam allowance back and pinned it so it wouldn't get in the way.) The shorter pocket piece on the left is what we're sewing now.
Lay the piece on the front panel face to face, mirroring the other pocket piece. The yellow line on the pocket piece should be lined up on top of the pocket welt edge.
Sew from the back, just the length of the line, not all the way to the edge.
Now the front panel should look like it has a pair of elephant ears. Don't worry, it will be a pocket soon enough.
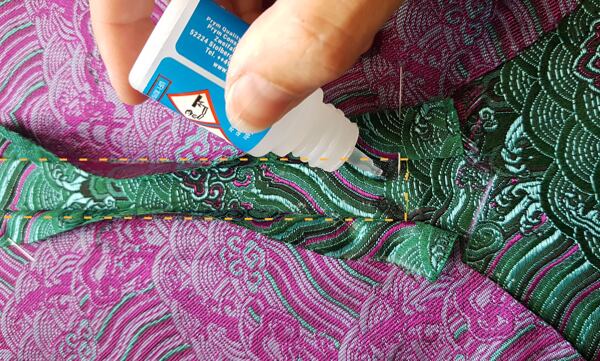
Drop a bit of fray stopper at each of the four corners of the pocket welt and let it dry.
Turn the piece over to the back. Using a small, sharp pair of scissors, cut a slit at the middle with a sort of triangle at each end as shown below. This is the pocket opening. Cut corners almost to the seam line. Be careful not to cut into the pocket pieces! Only cut the front panel fabric.
Rip out the marking stitches. You won't need them anymore.
Pull the pocket through the slit. Everything comes to the back, including seam allowances and triangles. Fold the larger pocket piece and press the 3/4" (2 cm) welt corresponding to the width of your pocket opening from the seam line.
In the picture below you can see this pressed piece at the bottom. The smaller piece is folded up at the top.
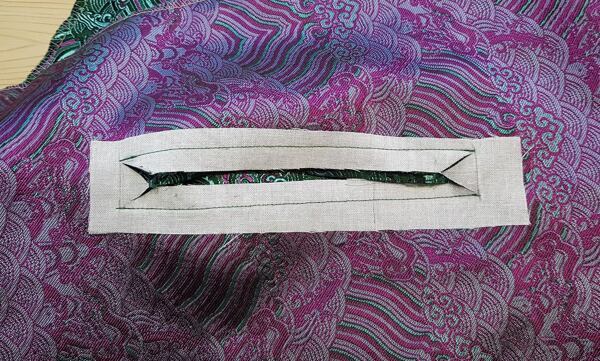
From the front the pocket looks like this now. It's starting to come into shape even if it's still a little crooked.
Straighten everything up. If you can't get a nice corner, it might not be cut deep enough. Double check your measurements and press in place.
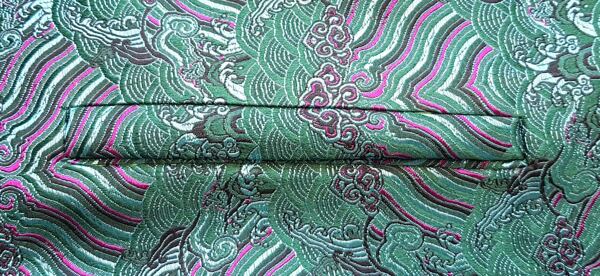
Now the pocket is ready for final sewing. Since I cut the pocket piece so that the motif would line up exactly with the motif on the front panel, it is almost invisible.
You don't have to go for a perfect pattern match like this, which can take a lot of extra fabric. Another good option is to cut the pocket deliberately in a different direction or in a place where there is no pattern. The main thing is that the two pocket welts should have mirror images of the same motif if possible.
Finally, sew all around the pocket opening, keeping close to the edge. (Note: When sewing the lower edge, don't forget to move the back piece of the pocket out of the way, otherwise you'll sew your pocket closed!)
Match the thread to the brocade and the stitches will blend into the background.
Sew the pocket together to finish. Line up the two pieces, face to face, sew around with a straight stitch and finish rough edges with a zigzag if you haven't already. It doesn't have to be perfect; the pocket will be hidden under the lining.
Do the other pocket the same way.
Your pockets are done!
Now, as a reward for all that detail work, we get to take a huge step forward... sewing the body of the jacket!
Sewing the jacket body
Since a bomber has dropped shoulders and a lower sleeve head, it's a lot like sewing a t-shirt or a shirt.
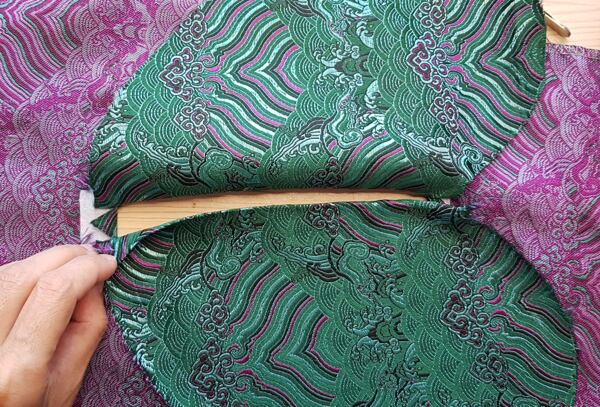
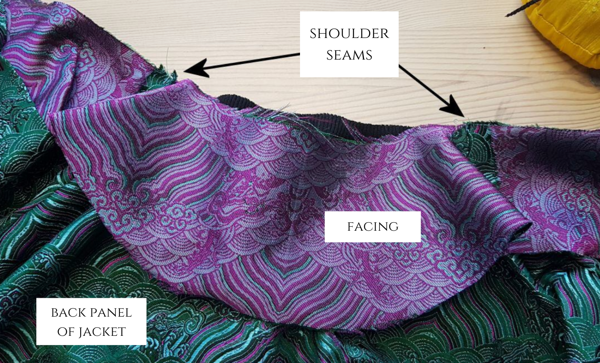
First sew the shoulder seams. Sew the back and front panels together, face to face, along the shoulder.
Attach the sleeves. Place the sleeves on the jacket at the sleeve opening. Make sure you line up the pattern marks.
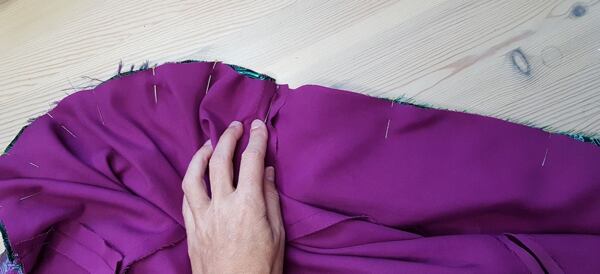
Sew the sleeve length and side seam. Turn the whole thing inside out. Start at the armpit and sew to the end of the sleeve, then from the armpit to the hip. Do this on both sides.
It's starting to look like a bomber. (This is a good time to try it on for size.)
Cut a strip of ribbing of the needed length and width.
The measurements are given in the pattern, based on what size your jacket is. The ribbing for the waist will be shorter than the lower edge of the jacket (it should be around 80% of the lower circumference of the jacket). That gives the jacket its shape. You stretch the ribbing as you sew, so the bottom of the jacket will be gathered.
Since the ribbing is doubled over, the strip width is double, plus seam allowance. So if the finished trim should be 2" wide (5 cm), you'll start with a strip 5 1/4" wide (13 cm) and fold it in half lengthwise before you sew it on.
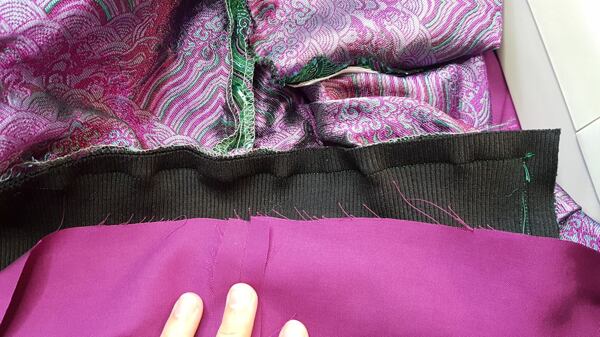
Sew the folded strip of ribbing along the lower edge of the jacket. To make sure you stretch it evenly, start at the center and pin the ribbing in a few spots.
The ribbing should be no problem for an all-purpose needle, but if your machine seems to have problems or is skipping stitches, try a stretch or jersey needle for this step.
Lay the folded ribbing along the bottom edge of the jacket.
After sewing, the bottom of the jacket is slightly gathered.
Some bomber jackets have ribbing along the whole length of the bottom. I think it looks better if there's a bit of solid material at the front on either side of the zipper. This makes it easier to zip up too.
After sewing the long edge of the ribbing in place, notch the corners of the seam allowance in the jacket material (use a drop of fray checker here), spread the corners open and sew the short end of the ribbing.
Mark the seams at the corners
Notch the corner
Spread open the corner and finish sewing the end
Finished ribbing
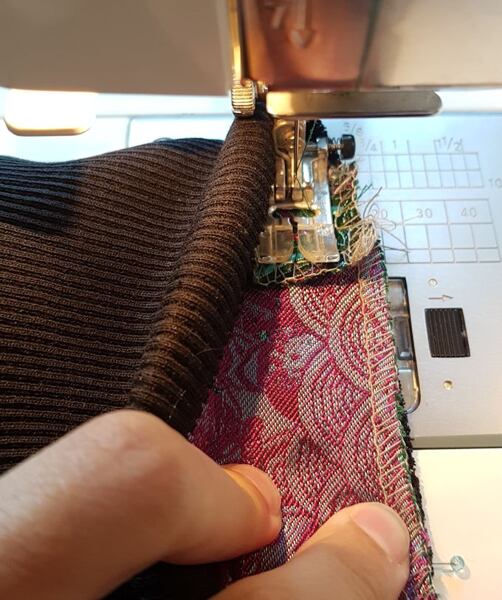
Ribbed cuffs
The cuffs are done pretty much the same way. First sew the short ends of the ribbing together, then turn the the piece back in half, right side out, to make a cuff.
Pull the end of the sleeve into the prepared cuff, align the seams and pin in place with the rough edges lined up. Pin at two or three spots so you know how much to stretch. Sew the cuff on from the inside as shown.
Ribbed collar
The last bit of ribbing goes at the collar. The strip is cut into a sort of tapered shape. Again, it is a bit shorter than the circumference of the neck opening, but not much – the neckline shouldn't have much gathering.
The collar is folded lengthwise. We'll sew it on along the curved edge.
Pin the collar to the neckline. Make sure you line up the center and shoulder marks. Sew in place.
Right: The collar as seen from the inside after sewing.
Leave the seam allowance clear for the zipper later. The point of the collar should hit where the seam allowances for the collar and the zipper cross.
This is what the collar should look like from the right side of the jacket.
We'll sew it in place in the next step.
Zipper and facing
The zipper goes in between the jacket and the lining, so we'll be doing these two steps in parallel.
We'll do it a little differently than it's shown in textbooks (an in some patterns, like this one from Burda). This technique takes a little more time, but I think it's easier to follow, and harder to mess up.
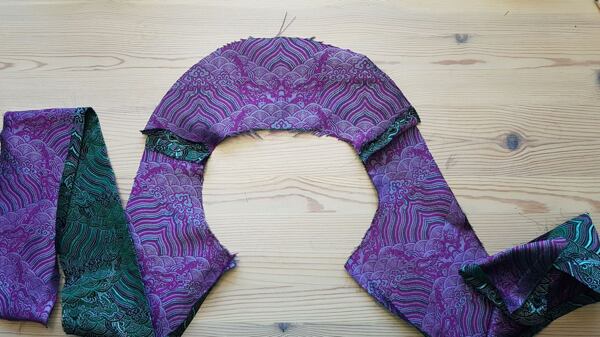
First, sew together the three pieces for the facing. There are two long front facings and a shorter one at the back of the neck. Sew them together at the shoulders.
Little things matter
Now it's time for one small detail that no jacket should be without, a loop to hang it on.
Cut a rectangle from a scrap of fabric about 4" (10 cm) by 1 1/4" (3 cm). Fold it in half lengthwise, right side in, and sew with the folded edge aligned to the edge of your sewing foot. Trim away the excess fabric and turn the tube right side out.
To turn it out, you can use a loop turner (sold at most fabric shops), a safety pin, or a knitting needle. You don't have to finish the ends; they'll be hidden.
Facing – Part one
Place the facing on the neckline, right sides facing, along where you just sewed on the collar. Line up the center and shoulder seams.
Pin the hanging loop in place between the ribbing and the facing panel. Sew the facing to the neckline. When sewing:
Remember to stretch the ribbing slightly as you sew. The lengths should match.
Sewfrom the center to one side and again from the center to the other side.
Sew following the seam line you sewed the collar on with so that the facing is attached at exactly the same place.
Sew all the way to the edge. This is different from when you sewed on the collar, where you sewed only to the seam allowance line.
Tuck the hanging loop between the ribbing and the facing panel
Sew along the same seam line where the collar is attached to the jacket.
I spread the pieces out for this photo to show how they lie. But when you sew, keep the edges lined up.
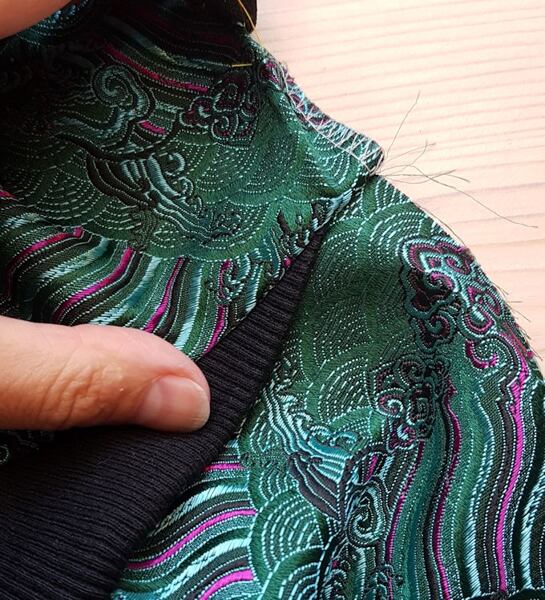
The collar has been sewn between the jacket shell and the facing. The photo shows the jacket and facing laid flat.
Sewing on the jacket zipper
Time to put in the front zipper.
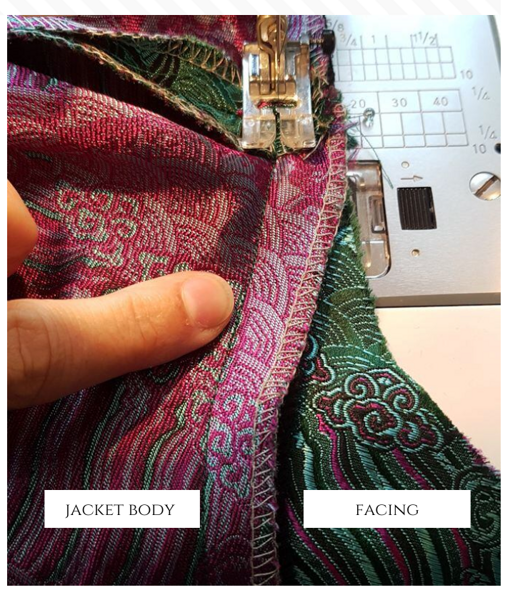
Fold back the seam allowance for the zipper and iron in place. Do the same for the seam of the facing, so that it's ready when you get there.
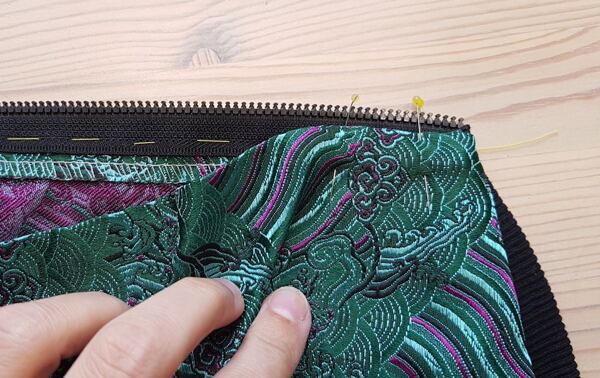
Pin the zipper in place and make sure everything lines up (top and bottom, the brocade motif). Stitch it loosely in place. Don't forget to leave a seam allowance at the bottom.
Pinned...
...and stitched to hold it in place
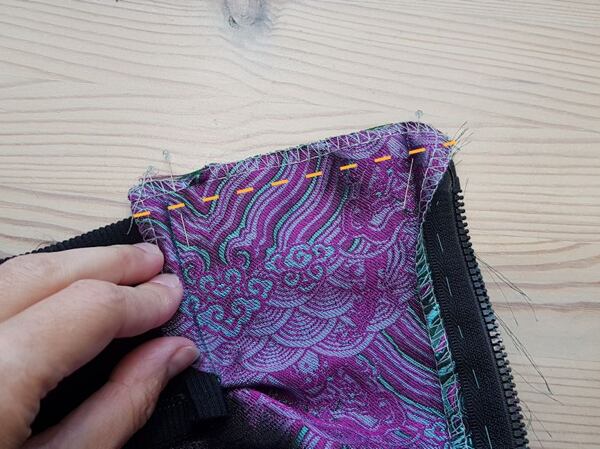
At the neck, fold the end of the zipper tape to the back – once the facing is sewn up, it will be hidden inside.
The photo shows the view from the back. The zipper is stitched to the front panel of the jacket and the facing is pinned in place for sewing later.
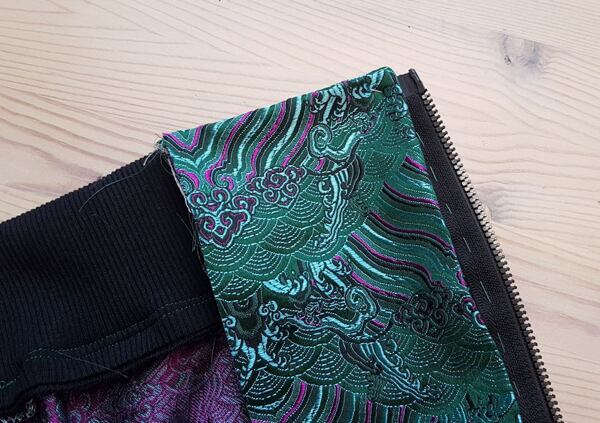
Facing – Part two
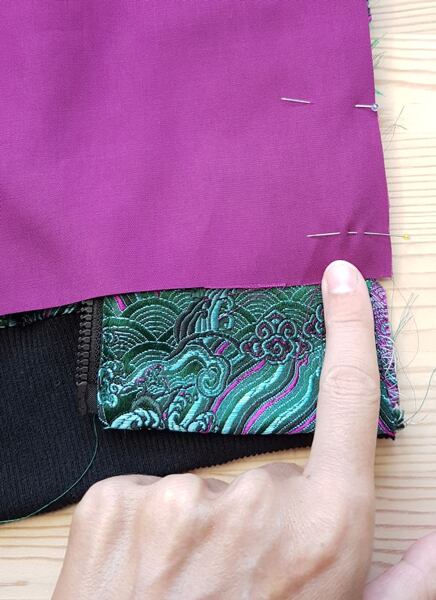
At the bottom of the jacket, sew the bottom of the facing to the section between the ribbing and the zipper.
Turn out the facing so that it is lying right sides facing on the jacket front. Loosen the stitches at the bottom of the zipper so that you can sew from edge to edge. Sew the bottom as shown by the dotted line in the picture below.
(The seam allowance shown in the picture is a little narrower than it should be; don't let it confuse you.)
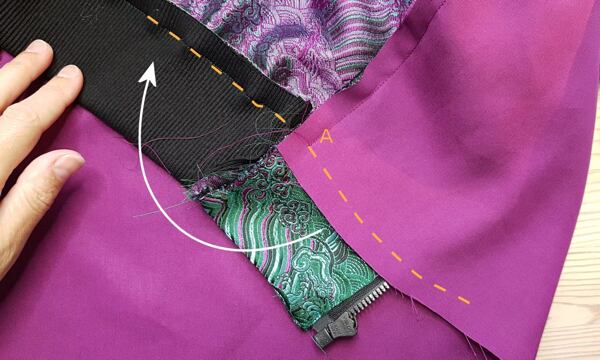
Turn the facing back to the inside of the jacket. Now it is sewn both at the top and bottom; only the long front edge remains.
From the bottom, pin the facing to the zipper. You should end up with a zipper sandwich – the jacket's front panel on top, the facing on the bottom (both with folded, pressed seam allowances) and the zipper tape in the middle.
Sew the sandwiched layers together.
Top stitch with the jacket lying face up. If you've pinned well, the stitching on your facing will look just as nice as the front.
Sew close to the folded edge – the stitch line should be about 1/8" (3 mm) from the fold. I used a regular sewing foot with the needle all the way on the left, but if your machine doesn't let you move the needle to the side, use a zipper foot.
Congratulations. You're practically done! The only thing left is the lining.
Lining your bomber jacket
Sure, you can wear a bomber without a lining. But if you do, you've got to clean up all of your seams (with a bias tape is best). Then your jacket will look nice on the inside too.
Of course, the lining takes your jacket up a notch, plus it keeps you warmer and protects the brocade from wear and tear.
Trace and cut a back panel, two front panels, and two sleeves from your lining fabric.
The pieces are the same size as for the jacket shell. The only difference is that the back and front panels are reduced by the area covered by facing.
Lining – Back panel
Follow along with the pictures below:
1. Trace the back panel onto the lining, without seam allowance.
2. Place the pattern for the back facing panel and trace.
3. You won't need the lines that have been crossed out here.
4. Add the seam allowance and cut out the piece.
Lining – Front panel
Do the same for the front panels. Subtract the front facing piece from the pattern. The front panel of the lining will be much narrower when you're done.
Sew the lining together just as you did the jacket shell.
Sew along the shoulders
Attach the sleeves
Sew the sleeves and side seams from the armpit. The only difference here is that you will leave a gap of 5" (13 cm) in one of the side seams.
You don't have to finish the rough edges of the lining seams, just press them in place.
The lining, sewn together with a gap in one side.
Sewing in the jacket lining
Lay out the jacket, face side up, with the facing spread open as shown below.
Lay the lining, wrong side up – right sides facing – on the jacket.
Pin the lining to the facing panel. Make sure you align the center of the back panel to the center of the facing panel. Line up shoulder seams too.
Pin along the facing all the way to the bottom, leaving space only for the seam allowance at the bottom.
Sew the lining to the facing. Start at the center and sew down one side, then again down the other.
Be careful on the back panels – there's a definite curve here and the fabric might stretch out. Take your time.
Some people might stop sewing here, turn the lining right side out, and hand sew the whole bottom edge. Not us.
We go fearlessly on.
The bottom of the bomber is now as shown below. The lining has been sewn to the facing all the way to the seam allowance.
Rotate the lining clockwise, in the direction shown by the arrow. You will be rotating it around point A so that the yellow dotted lines come to lie atop each other. The lining will be face side down with its seam allowance lined up along the seam allowance of the waistband.
The center of the back panel of the lining should be aligned to the center of the jacket and the side seams should also line up (see photo below). Pin in place and sew along the whole length.
Sew on the seam line where the ribbing is attached to the jacket. Don't forget to gently stretch the ribbing as you sew.
The result should be a sort of sack, sewn shut, that you wouldn't be able to turn right side out... if you hadn't left a convenient gap in one of the side seams of the lining.
Mind the gap
Reach into the gap and pull the whole jacket through. You might want to start with the nearest sleeve, then the bottom edge, and the other sleeve last.
You still have to sew the lining at the sleeves. You can do this by hand or machine. To do it by hand, fold the seam allowance at the end of the sleeve lining and use an invisible stitch to attach it to the cuff.
To do it on a machine, use the gap again. Reach in and pull out the jacket sleeve and the lining sleeve. They'll both be inside out as you can see in the next photo. Tuck the cuff into the jacket sleeve.
Line up the edges of the lining sleeve and the ribbing (align the seams). Sew all around. From the right side of the jacket, reach into the sleeve and turn it right side out, pulling the lining with it.
There are a few details left to finish off by hand: the unfinished ends of the facing panels at the bottom of the jacket and the gap in the side seam.
The facing at the bottom of the jacket needs to be finished.
Fold the edge under, straighten, and pin.
Stitch together by hand.
Sew up the gap in the lining with an invisible stitch.
Your bomber is done!
Good job. You are the proud owner of a beautiful new jacket.
Here's hoping it serves you well and gets you many well-deserved complements.
Turns out this "lady's" bomber looks great on guys too ;-)
I grew up in a household where a love of fashion, textiles, and craftsmanship were a part of everyday life. Over time, I’ve acquired expertise as a seamstress in my own right, a skill I draw upon in my work as a professional copywriter. I’m the author of the book Everything You’ve Ever Wanted to Know about Fashion and the founder of the blog Fashion Hell. Most recently I’ve turned my energies to making sure that Sartor’s website offers the very best articles and product information possible.
Subscribe to our newsletter and feed your creativity. You won't get any spam from us, just the sort of interesting and informative content that we'd like to receive ourselves.
Once in a while
New arrivals and discounts
Inspiration and tutorials
By registering you agree to the processing of your personal data
We use cookies for the proper functioning of this e-commerce shop, to adapt the site content to your needs, for statistical and marketing purposes and to personalize advertisements from Google and other companies. By clicking "Accept All", you consent to their collection and processing, and we will provide you with the best shopping experience.
Your cookies settings
Here you can enable cookies according to your own preferences.You can change those settings any time in the future by clicking 'Cookie settings' link in our website's footer.
Necessary cookies help make a website usable by enabling basic functions like page navigation and access to secure areas of the website. The website cannot function properly without these cookies.
Preference cookies enable a website to remember information that changes the way the website behaves or looks, like your preferred language or the region that you are in.
Statistic cookies help website owners to understand how visitors interact with websites by collecting and reporting information anonymously.
These cookies are used by advertising and social networks, including Google, to transmit personal data and personalise ads to make them interesting to you.


")
")


")


Comments(0)