
Why sew your own silk scrunchie
This tutorial shows you how to sew your own pretty – and useful – silk scrunchie.
If you wear a lot of ponytails, pigtails, braids and buns, you probably have a good stash of hair accessories at home. But have you got a homemade scrunchie in real silk or brocade? We can think of at least four good reasons to make one:
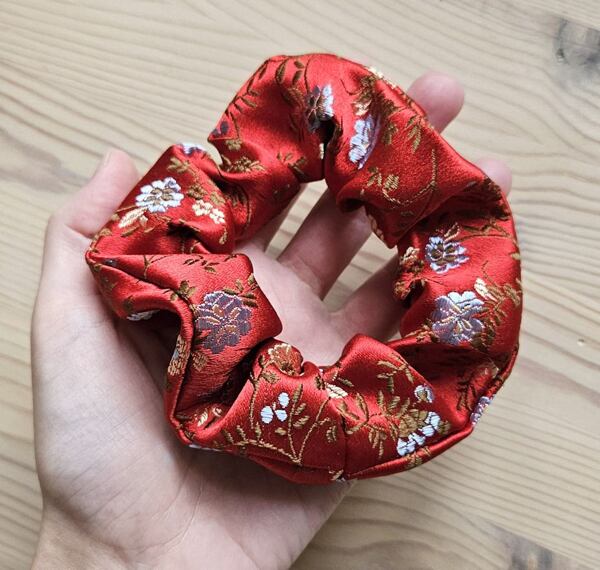
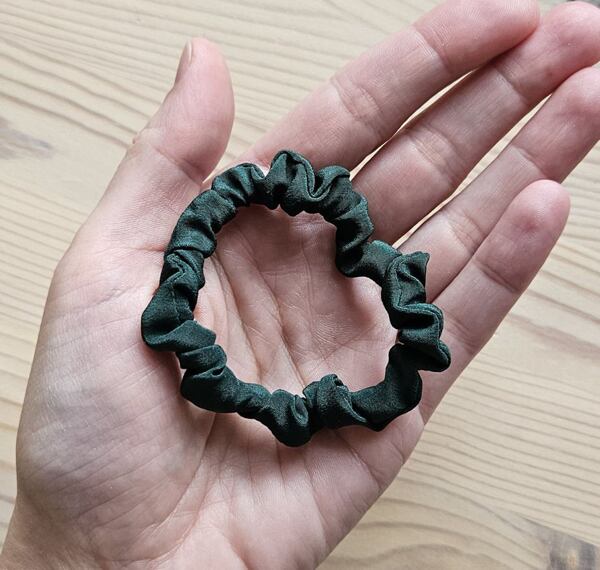
- They are beautiful – A brocade scrunchie is something you can wear to work or special events. If you prefer something a little quieter, go for a solid-colored silk instead.
- Silk is good for your hair – A silk scrunchie won’t knot up your hair. Quite the opposite – silk smooths your locks and won’t dry your hair or expose it to static electricity as synthetics do. Scrunchies don’t catch on your hair when you take them out.
- You’ll save money – Silk hair accessories are fashionable and can be expensive. For the cost of a single store-bought scrunchie you can make several of your own.
- They’re original – Do you enjoy making accessories, painting on silk, doing embroidery? An original silk scrunchie of your own design is truly one of a kind.
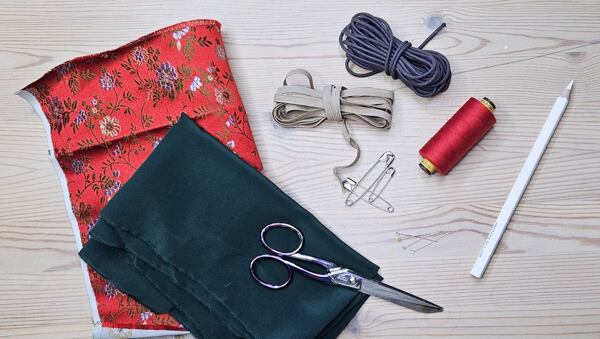
What you’ll need for hair scrunchie
Not much.
As a matter of fact, you can manage this little project without a sewing machine or other professional tools. While a machine can save time, you can sew a scrunchie by hand if you want to. You’ll need:
- A scrap of fabric (we cut lengths as small as 20 cm)
- A piece of elastic (round or flat)
- A ruler, marking chalk, scissors, pins, a safety pin for pulling the elastic through
- A needle and thread
- Optional: A sewing machine with a universal needle
Choosing silk scrunchie fabric
You can make a silk scrunchie with practically any silk fabric you have in your stash, even very fine, diaphanous materials like organza and chiffon, provided you know how to work with them. For beginners we recommend:
Silk satin, crepe marocain, duchesse satin: These smooth, glossy silks are gentlest to your hair
Silk dupioni and taffeta: Smooth fabrics in beautiful colors, less glossy than satin or charmeuse
Brocade: Not always pure silk, but always stunning; brocade is easy to sew with and there are endless colors and designs to choose from
Other great options are silk crepe de chine (a fine silk with a slight sheen, kind to the hair) or rayon and cotton fabrics
Fabric remnants are perfect for sewing scrunchies. You’ll find plenty to choose from in our shop at great prices.
Scrunchie sewing pattern
The pattern for our scrunchie is super simple – a long, narrow rectangle. The width depends on the look you want.
Big scrunchie
A big scrunchie would be about 2" wide (4–6 cm).
You’ll need a strip of fabric twice that width, plus seam allowance.
Example: multiply 2 x 2" and add 2 x 3/8" seam allowance = total width 4 3/4"
Skinny scrunchie
A skinny scrunchie is around 3/4" wide (1–2 cm).
Again, double the width plus 3/8" seam allowance on each side. After sewing, trim away the extra fabric in the seam allowance to make the scrunchie easier to turn out.
The width is entirely up to you. Slim it down or go mega. Try different variations and see what you like. Our examples are just a guide.
Length
Cut a length of elastic 6" to 8" long (15–20 cm). Your fabric rectangle should be two or three times longer than the elastic in its relaxed state.
To start with:
- Choose a flat elastic tape 3/8" wide (5 mm) or round elastic 1/8" diameter (2–3 mm) and cut 8" of elastic (20 cm), including an extra 3/4" (2 cm) for overlap
- A strip of fabric 18" long (45 cm)
You may have to experiment with your elastic before sewing. The length you use depends on two things. The first is the type of elastic.
- Wider elastic tape has less stretch; you might need a longer piece.
- Softer round elastic is stretchier; you may need a shorter piece.
Other factors are your personal preferences and how thick your hair is. Everyone wants something a bit different. So if you find that one kind of elastic doesn’t work for you, try another. You don’t even have to sew another scrunchie. Just swap out the elastic for another one until you get it just right before sewing your scrunchie closed.
Sewing your scrunchie
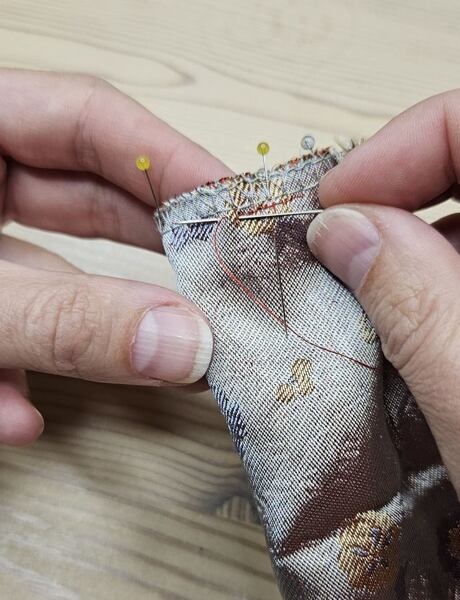
Finishing the edges
For fabrics that fray – brocade, dupioni – finish your edges before you sew. (See our tips for sewing with brocade.)
, the crepe de chine 1 1/2” x 14” (4 x 35 cm)")
Sewing the tube
Fold the fabric strip in half lengthwise with the face side in. Sew straight along the long edge (use a backstitch if sewing by hand). Leave a gap, as shown in the photo.

If the fabric scrunched up a bit as you were sewing (this happens all the time with satin, crepe de chine, and similar fabrics), press the piece.
Turning it out and sewing the ends
Pull one end of the tube in and through to the other end so that the ends line up neatly.


 and pin in place.")
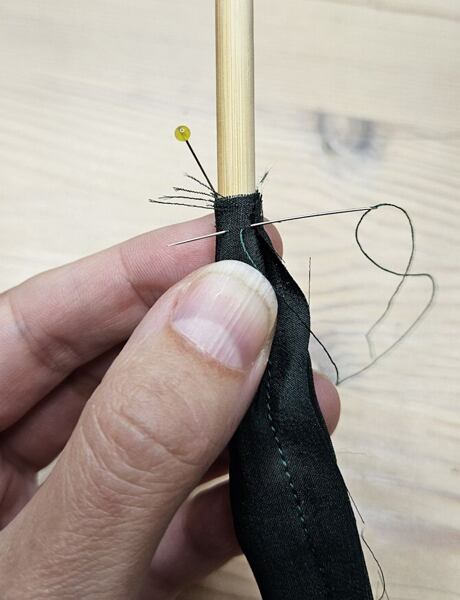
5. Sew the ends together all around. Sew by hand using a back stitch – the sewing foot on your machine won’t fit unless you are making a huge scrunchie.
Tip for skinny scrunchies: Insert a chopstick or wooden skewer in the tube while you do this part to make sewing easier.


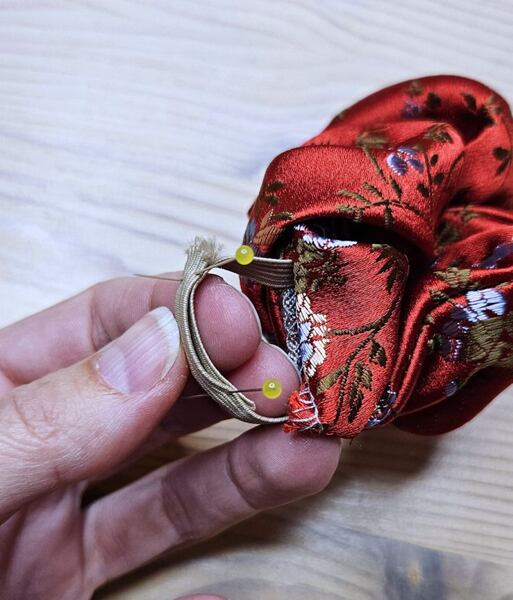
7. Use a safety pin to pull through the elastic. Sew the ends together. You can knot them if you like, but sewing them together is easy and it looks a lot neater, especially for wide elastic tape.
At this point, try on your new scrunchie. It’s not too late to shorten the elastic or swap it out for a different one.
Finish up by sewing the gap closed with an invisible stitch.
Done!
Your scrunchie is done! Did it turn out the way you wanted? If not, don’t despair – try again, tweaking the measurements and fabric until you get it just right.
Caring for your scrunchie
You can wash your scrunchie following the directions that apply for the fabric you used. For satin or brocade scrunchies, be especially careful with hairpins and sharp fingernails that can snag the loose satin weave. Of course, your new hairband won’t last forever, especially if you use it daily. It’s a good thing you can make another whenever you like.
If the elastic loses its stretch, you can easily change it. Just rip out the invisible stitches at the gap, take out the old elastic, put in a new one, and stitch closed – good as new.


Comments(0)